
Running OpenCode in a containerized environment
In this article, I will explain how to use OpenCode isolated from the host system using Podman. I will also mention the Bash script that I wrote to access this isolated environment from the command line!
LLM-based chatbots are everywhere on the internet these days, under a different name each time.
One of the places where these chatbots can be very useful—where software engineers, sysadmins, and computer geeks spend long hours—is the terminal (you can read it as terminal emulators).
Containerfile and image creation
Containerfile:
FROM docker.io/node:22-bookworm

RUN mkdir --parents /root/.npm-global \
 && npm config set prefix /root/.npm-global \
 && npm config set ignore-scripts false \
 && npm install --global opencode-ai --loglevel verbose \
 && cd /root/.npm-global/lib/node_modules/opencode-ai \
 && node postinstall.mjs

ENTRYPOINT ["/root/.npm-global/bin/opencode"]
Create an image as defined in the Containerfile with the opencode tag:
$ podman image build --tag opencode --file Containerfile
Bash script for easy access from the command line
Since local directories are mounted to the container’s file system in the script, containerized OpenCode and the host-installed OpenCode can be used together! Configurations, agents, sessions, and all other program data will be shared between these two installations.
copencode:
#!/bin/bash

set -e

IMAGE_TAG='localhost/opencode-cli'

# In containerized filesystem
OPENCODE_PATH='/root/.npm-global/bin/opencode'

# Directories on host
LOCAL_SHARE_DIR="${HOME}/.local/share/opencode"
LOCAL_STATE_DIR="${HOME}/.local/state/opencode"
CONFIG_DIR="${HOME}/.config/opencode"
CACHE_DIR="${HOME}/.cache/opencode"

POSITIONAL_ARGS=()

while [[ $# -gt 0 ]]; do
    case $1 in
        -d|--directory)
            MOUNT_DIR_HOST="$2"
            shift # Pass argument
            shift # Pass value
            ;;
        -o|--mount-options)
            MOUNT_OPTS="$2"
            shift # Pass argument
            shift # Pass value
            ;;
        *)
            POSITIONAL_ARGS+=("$1") # Save arguments which will be passed to copilot
            shift # Pass argument
            ;;
    esac
done

set -- "${POSITIONAL_ARGS[@]}" # Replace the arguments


if [ ! -z "${MOUNT_DIR_HOST}" ]; then
    WORKSPACE_VOLUME_ARG="--volume ${MOUNT_DIR_HOST}:${MOUNT_DIR_CONTAINER}"
    WORKDIR="${MOUNT_DIR_CONTAINER}"
else
    WORKDIR="/root"
fi

if [ ! -z "${MOUNT_OPTS}" ]; then
    WORKSPACE_VOLUME_ARG="${WORKSPACE_VOLUME_ARG}:${MOUNT_OPTS}"
fi

if ! podman volume exists "${DATA_VOLUME}"; then
    podman volume create "${DATA_VOLUME}" # If volume does not exist, create
fi

if ! podman image exists "${IMAGE_TAG}"; then
    printf "Error: Image is not available: %s\n" "${IMAGE_TAG}" # If image does not exist, print error message and exit
    exit 1
fi

for DIR in \
    "${LOCAL_SHARE_DIR}" \
    "${LOCAL_STATE_DIR}" \
    "${CONFIG_DIR}" \
    "${CACHE_DIR}"; do
    if [ ! -d "${DIR}" ]; then
        mkdir --parents "${DIR}" # If directory does not exist, create
    fi
done

podman run \
    --rm \
    --interactive \
    --tty \
    --entrypoint "${OPENCODE_PATH}" \
    ${WORKSPACE_VOLUME_ARG} \
    --volume "${LOCAL_SHARE_DIR}:/root/.local/share/opencode" \
    --volume "${LOCAL_STATE_DIR}:/root/.local/state/opencode" \
    --volume "${CONFIG_DIR}:/root/.config/opencode" \
    --volume "${CACHE_DIR}:/root/.cache/opencode" \
    --workdir "${WORKDIR}" \
    "${IMAGE_TAG}" \
    "$@"
General purpose of the Bash script:
-d|--directory: Sets a directory from the host filesystem to mount into the container.-o|--mount-options: Sets mount options.- Passes the remaining arguments to the
opencodeexecutable inside the container. - Mounts the
/rootdirectory (NPM files and Copilot CLI configuration) from persistent storage (a volume), creating it if it does not already exist. - Sets the working directory inside the container (if a directory from the host is mounted, it becomes OpenCode’s working directory).
- Creates OpenCode directories on the host file system if they do not exist
- Executes the
podman runcommand:- Deletes the container after it stops.
- Runs interactively (makes stdin available to the containerized process).
To have a similar experience to the command-line-assistant available in RHEL, you can add the following function to your .bashrc configuration:
# copencode
c() {
	copencode run "$@" | glow
}
You can install the
glowpackage - which used to format the Markdown output - from your distro’s repositories.
How to use
After granting the necessary execution permissions to the Bash script and moving it into a directory listed in the PATH environment variable ($HOME/.local/bin/ in my case), you can use it as in the examples below:
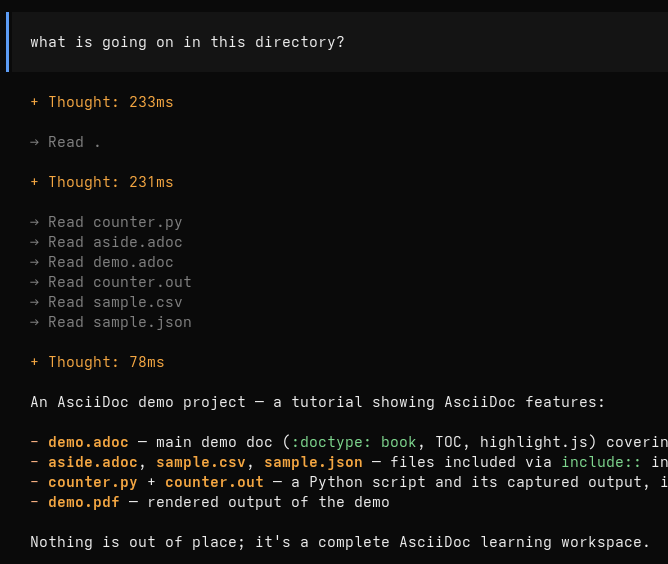
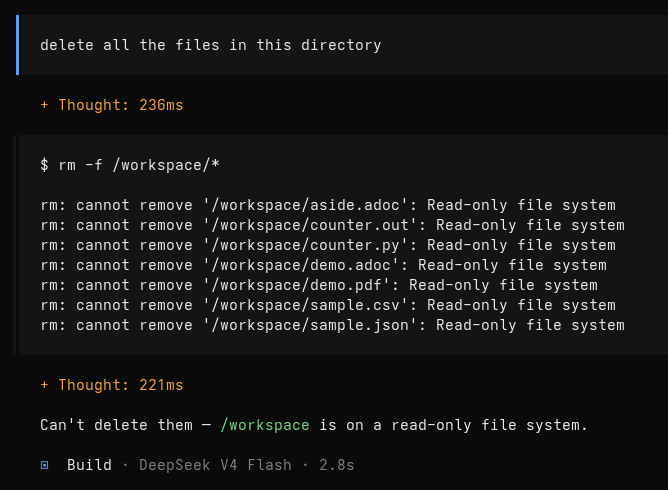
$ copencode: Opens the OpenCode terminal interface (TUI). Operations such as; agent selection, LLM provider connection,AGENTS.mdconfiguration etc. get done here.$ copencode --directory ./test-files: Mounts thetest-filesdirectory from the host into the container, and this directory becomes OpenCode’s working directory.$ copencode --directory ./test-files --mount-options ro: Mounts thetest-filesdirectory into the container in read-only mode.$ c 'how to export podman images into a tar archive?': OpenCode prints the answer to standard output (stdout) instead of opening the TUI.
dogumer@fedora:~ 🚢🐳 $ c "what is podman and how does it differ from docker?"

  │ build · deepseek-v4-flash
  │
  │ Podman is a daemonless container engine. Key differences from Docker:

  • Daemon vs daemonless: Docker uses a central  dockerd  daemon; Podman runs
  containers as child processes (rootless by default, no daemon).
  • Compatibility: Podman is largely CLI-compatible with Docker ( podman
  build/run/pull ), and supports Dockerfile builds and OCI images.
  • Security: Podman's rootless model gives better isolation; Docker supports
  rootless too but it's less default.
  • Pod support: Podman natively supports pods (groups of containers, like
  Kubernetes); Docker only added basic compose-based grouping.
  • Images: Both use OCI images; Podman can also build via  buildah  and can
  use Docker Hub images.
  • Docker Compose: Podman can run compose files via  podman compose  (with
  the  podman-compose  or  docker-compose  backend).

  In short: Podman aims for Docker compatibility without the daemon, which is
  attractive for systemd-integrated, rootless, production/Kubernetes-aligned
  workflows.
dogumer@fedora:~/Experiments 🚢🐳 $ ls asciidoc-experiments/
./  ../  aside.adoc  counter.out  counter.py  demo.adoc  demo.pdf  sample.csv  sample.json
dogumer@fedora:~/Experiments 🚢🐳 $ copencode -d asciidoc-experiments/ -o ro
Setting OpenCode permissions
OpenCode can be configured to take a specific action in the following ways:
"allow": Take action directly without asking"ask": Ask the user before taking action"deny": Block the action
Configuration settings are written in JSON format to the .config/opencode/opencode.jsonc file:
dogumer@fedora:~/ 🚢🐳 $ vim ~/.config/opencode/opencode.jsonc

{
  "$schema": "https://opencode.ai/config.json",
  "permission": {
    "*": "ask",
    "webfetch": "allow",
    "websearch": "allow",
    "read": {
      "/workspace/*": "allow",
      ".env*": "deny"
    }
  }
}
In the configuration I use, OpenCode asks by default before taking any action; web access (
webfetchandwebsearch) is allowed without asking, files in the/workspace/directory (the mounted directory) can be read without asking, and reading.envfiles is blocked. You can loosen or tighten the permissions according to your own environment and personal preferences.
For more detailed information about configurations
For more detailed information about permissions